Setting Up a Portable High-Fidelity Audio Rig for Field Recording

A field researcher in the Olympic Peninsula reaches for a high-end shotgun microphone to capture the sound of a receding glacier, only to realize the wind noise has completely obliterated the low-frequency data. The recording is unusable because the setup lacked a proper acoustic shield and a dedicated low-noise preamp. This post outlines how to construct a portable, high-fidelity audio rig designed for field recording in unpredictable environments. We will focus on selecting components that prioritize signal-to-noise ratio (SNR) and durability over aesthetic design, ensuring your data capture remains professional regardless of your location.
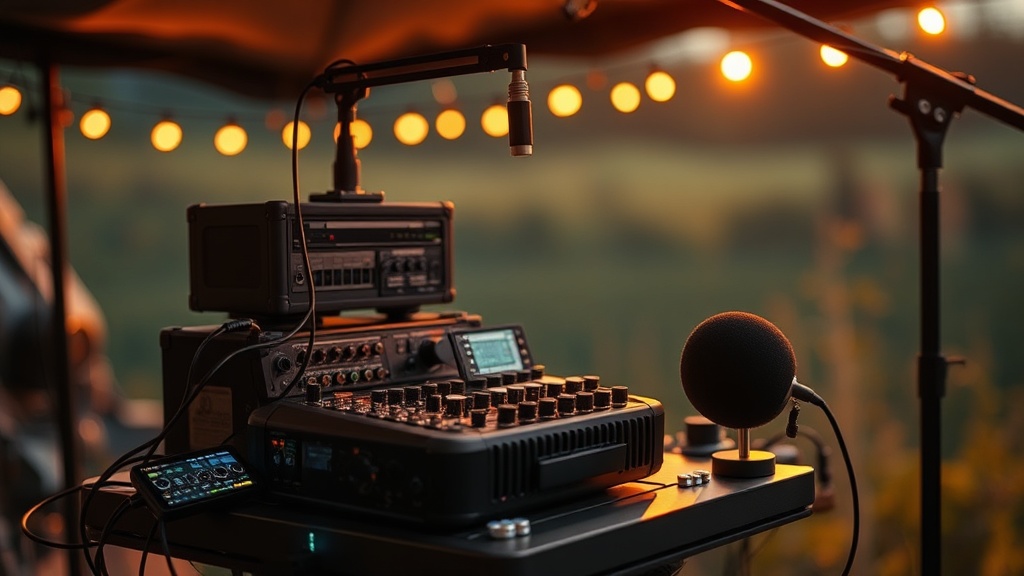
The Core Components of a Field Audio Rig
Building a field rig requires moving away from consumer-grade USB microphones and toward professional XLR-based systems. A professional field setup consists of four primary pillars: the transducer (microphone), the preamplifier/recorder, the power source, and the environmental protection. Each component must be vetted for its ability to handle high-SPL (Sound Pressure Level) and low-noise floors.
Selecting the Right Transducer
The microphone is your most critical investment. In field recording, you generally choose between two types: directional microphones for isolating specific sounds and omnidirectional microphones for capturing ambient environments. For high-fidelity work, look for microphones with a wide dynamic range.
- Shotgun Microphones: Best for isolating a single source, such as a bird call or a specific mechanical sound. The Sennheiser MKH 416 is the industry standard for a reason; its interference tube design handles wind and directional focus exceptionally well.
- Stereo Pairs (X/Y or ORTF): Essential for capturing the "space" of a location. If you are recording a forest or a stream, a pair of Lom Usi Pro microphones or Rode NT5s can provide a realistic stereo image.
- Contact Microphones: If you need to record vibrations from a tree, a rock, or a piece of machinery, a contact mic like the AKG C411 allows you to bypass air-borne noise entirely.
The Preamp and Digital Recorder
The preamplifier's job is to boost the tiny electrical signal from the microphone to a level the digital converter can process without adding "hiss" (electronic noise). In the field, you need a device that combines a high-quality preamp with a reliable digital recorder. The Zoom F6 is a standout here because it features 32-bit float recording. This technology is a game-changer for field work because it virtually eliminates the possibility of clipping (distorting) if a sudden, loud sound occurs, as you can recover the audio in post-production without losing data.
When selecting a recorder, prioritize the number of XLR inputs and the quality of the internal clock. A stable clock ensures that your audio remains in sync and free of jitter. For more complex setups involving multiple remote sensors, you might look into setting up a local digital archive for field research to manage the high volumes of data being generated.
Environmental Management and Power Stability
High-fidelity audio is extremely sensitive to environmental interference. A single gust of wind or a drop in temperature can ruin a multi-hour recording session. You cannot rely on "weather-resistant" marketing claims; you must build physical barriers into your kit.
Wind Protection and Acoustic Shielding
A standard foam windscreen is insufficient for field use. To capture high-fidelity audio in even moderate breezes, you require a "Blimp" or "Zeppelin" system. This is a rigid, aerodynamic shell that surrounds the microphone, paired with a "deadcat" (a synthetic fur cover). The Rycote Windshield System is the benchmark for this. It creates an air buffer that prevents wind turbulence from hitting the microphone capsule directly.
For stationary recording, such as monitoring a river in the Cascades, consider using a specialized acoustic shield or even a small, portable tent structure to break the wind flow before it reaches your gear. This is not about blocking sound, but about breaking the kinetic energy of the moving air.
Power Management in the Field
Reliable power is the most overlooked aspect of audio field kits. Digital recorders and phantom power (the 48V required by many professional microphones) are heavy consumers of electricity. Relying on standard AA batteries is often a mistake due to their inconsistent voltage drop under heavy load. Instead, utilize high-capacity LiFePO4 batteries or dedicated external power banks that can provide a steady voltage via a DC-to-DC regulator.
If you are operating in remote areas where you are reliant on solar arrays for long-term monitoring, ensure your power station is capable of a clean sine wave output to avoid electrical hum in your audio. If you encounter issues with your charging efficiency, review our guide on why your solar panels aren't charging your gear fast enough to optimize your field uptime.
Practical Setup Workflow
A successful field recording session is won or lost in the first ten minutes of setup. Follow this technical checklist to ensure your rig is optimized before you hit record.
- Level Check (The "Silent" Test): Before recording your target sound, record 30 seconds of "room tone" or silence. This allows you to measure the noise floor of your gear. If the noise floor is too high, your preamps are likely working too hard, or your environment is too noisy.
- Gain Staging: Set your gain levels so that your peaks hit around -12dB to -6dB. If you are using a 32-bit float recorder, you have more leeway, but you should still avoid hitting 0dB to maintain the highest possible bit depth.
- Cable Management: Use Velcro ties to secure all XLR cables to your tripod or stand. A loose cable vibrating against a metal stand will create low-frequency "thumps" that are impossible to remove in post-production.
- Thermal Stabilization: If moving from a warm vehicle to a cold field environment, let your electronics sit in your bag for 20 minutes first. This prevents rapid condensation from forming on the internal circuitry and the microphone diaphragm. For more on this, see our documentation on protecting your tech from extreme cold and condensation.
The Cost-Per-Mile Metric: Value Analysis
In professional field work, the "price" of a piece of gear is less important than its "cost-per-mile"—the reliability of the tool over the duration of its useful life in the field. A $500 consumer microphone that fails after two trips to a humid rainforest is significantly more expensive than a $1,200 professional XLR microphone that lasts a decade.
When building your rig, prioritize the "Golden Triangle" of value:
Durability > Signal Purity > Portability.
A high-end field recorder like the Sound Devices MixPre series might have a high upfront cost, but its ability to handle extreme temperatures and provide high-quality preamps makes it a more cost-effective tool for long-term professional use. Avoid "all-in-one" solutions that attempt to be a jack-of-all-trades; instead, build a modular kit where every piece is a specialist in its specific function.
Summary Checklist for Field Audio Deployment
Before heading into the field, verify your kit against this technical specification:
- Microphone: Correct polar pattern for the environment (Shotgun vs. Stereo).
- Wind Protection: Full blimp system with synthetic fur cover.
- Recorder: 32-bit float capability enabled for high-dynamic-range environments.
- Power: Sufficient capacity for 1.5x the expected duration of the session.
- Cables: Shielded XLR cables with secure fastening points.
- Monitoring: Closed-back headphones (e.g., Sony MDR-7506) to accurately hear the noise floor.
Steps
- 1
Select Your Primary Recorder
- 2
Choose High-Quality Microphones
- 3
Manage Power and Connectivity
- 4
Protect Your Gear from Environmental Noise